What is an Activity in Android ? – All about Activities and Activity Life Cycle
What is an Activity?
Just like a web page of a website, an Activity is a page in an Android Application. Other elements like buttons, text elements, progress bars, etc. are contained in this activity. Consider it as a base on which you construct your application. An application can have numerous activities as per the need of the application. Whenever we open any application, one of its activity opens, its called the Launcher Activity. When you create a new project, android studio creates an activity by name “MainActivity.java” and its XML file my name “activity_main.xml“. It is the activity that opens up when an app is opened. You can change this whenever you want. Below, is an example of an empty activity, Views like Layouts, Buttons, Card views, Text views, Edit Texts, are placed inside this activity in the XML file and the actions to be performed on them are coded inside the java file of that particular activity.
Activity Life Cycle
As a user navigates through, out of, and back to your app, the Activity instances in your app transition through different states in their lifecycle. The Activity class provides several callbacks that allow the activity to know that a state has changed, that the system is creating, stopping, resuming, or destroying an activity.
Within the lifecycle callback methods, you can declare how your activity behaves when the user leaves and re-enters the activity. For example, if you’re building a streaming video player, you might pause the video and terminate the network connection when the user minimizes the app. When the user returns, you can reconnect to the network and allow the user to resume the video from the same spot. In other words, each callback allows you to perform specific work that is well suited for a given change of state. Doing the right work at the right time and handling transitions properly make your app more robust and performant and helps make the user experience better. For example, good implementation of the lifecycle callbacks can help ensure that your app avoids:
- Losing the user’s progress if they leave your app and return to it at a later time.
- Consuming valuable system resources when the user is not actively using it.
- Crashing if the user receives a phone call or switches to another app while using your app.
- Crashing or losing the user’s progress when the screen rotates between landscape and portrait orientation.
This article explains all about activities and the activity lifecycle in detail. It explains each of the callbacks: what happens internally while they execute, and what you should implement during them. It then briefly introduces the relationship between the activity state and a process’s vulnerability to being killed by the system. Last, it discusses several topics related to transitions between activity states.
Concepts of Activity Lifecycle
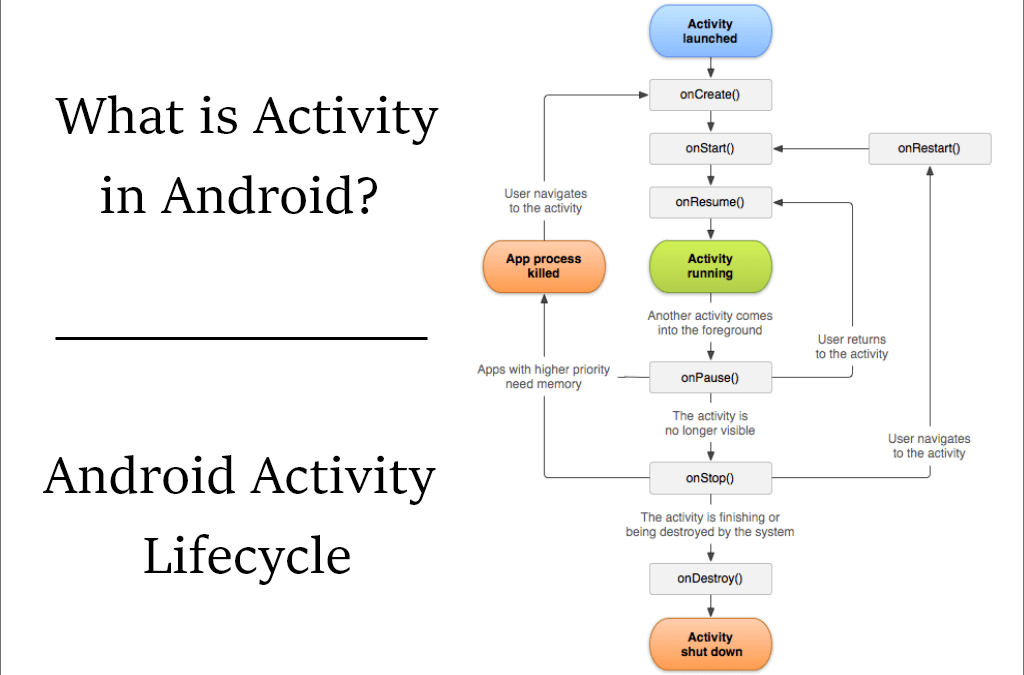
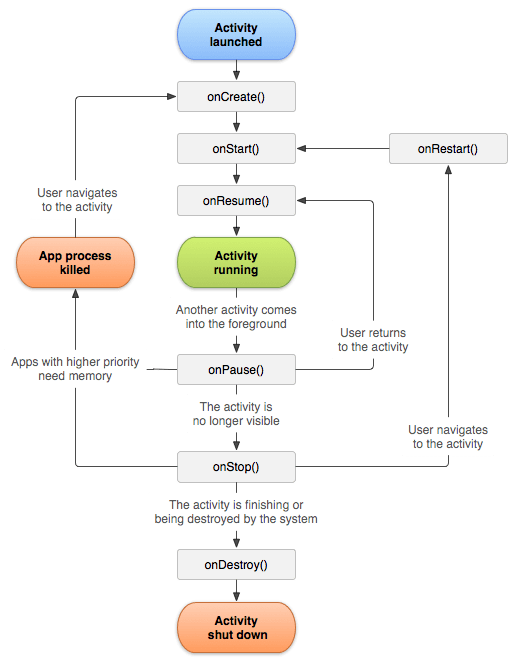
To navigate transitions between stages of the activity lifecycle, the Activity class provides a core set of seven callbacks: onCreate( ), onStart( ), onResume( ), onPause( ), onStop( ), onRestart( ) and onDestroy ( ). The system invokes each of these callbacks as an activation to the callbacks that you use to handle transitions between states.
When a user starts an application, the system calls methods to create and start an activity. Once the activity is started the user can then use the application and interact with the application. As the user begins to leave the activity, the system again calls methods to dismantle the activity. In some cases, this dismantlement is only partial, i.e. the activity still resides in memory, such as when the user switches to another app, and can still come back to the foreground. If the user returns to that activity, the activity resumes from where the user left off. With a few exceptions, apps are restricted from starting activities when running in the background. The system’s likelihood of killing a given process, along with the activities in it, depends on the state of the activity at the time.
Depending on the complexity of your activity, you probably don’t need to implement all the lifecycle methods. The method onCreate( ) is compulsory as it is the first method that runs when an activity is created. When you create a new activity in your android project, the onCreate( ) method is pre-written in the java file for you. However, you must understand each one and implement those that ensure your app behaves the way users as well as you expect.
Lifecycle Callbacks
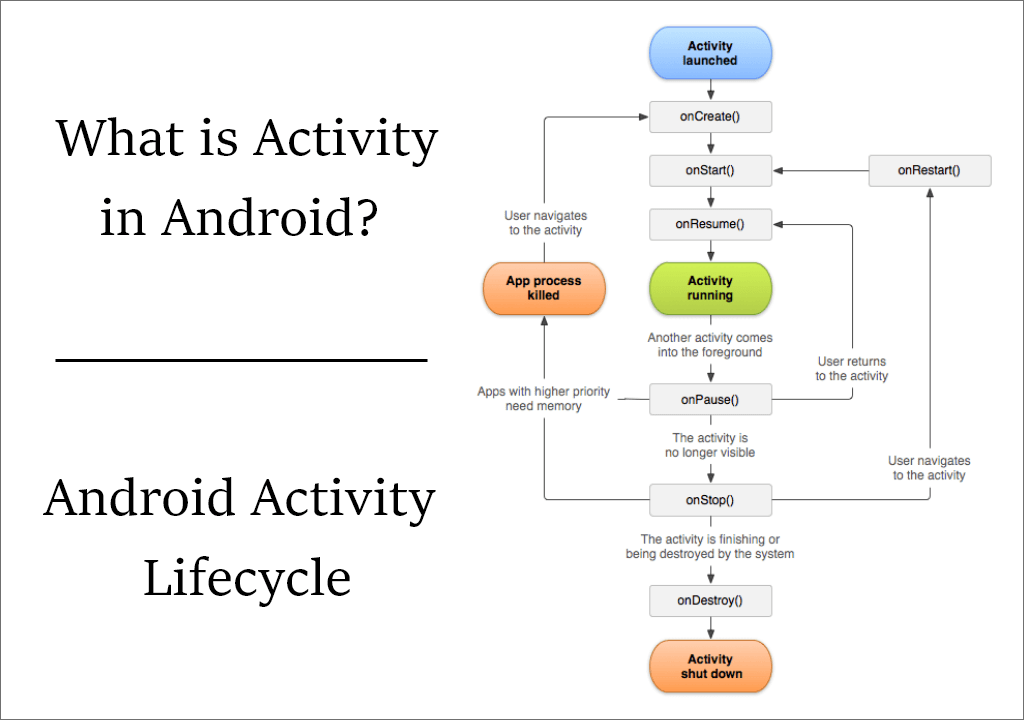
Now, we will look at the conceptual and implementation information about the callback methods used during the activity lifecycle. We’ll try to understand how and when each callback of the activity lifecycle works and how to program each of them. The image below shows exactly when is each callback method called during an activity’s lifecycle.
onCreate( )
This is the first callback that is fired when the system first creates an activity. You must implement this callback. When you first create a new activity Android Studio itself calls this method in the java file, i.e you get the code for this callback pre-written. You can see this in the image below.
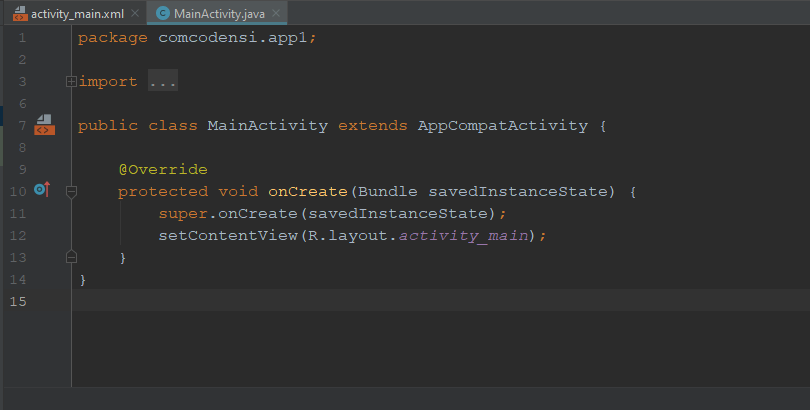
On creation of activity, it enters in the Create State. In the onCreate( ) method, the basic application logic that needs to be performed only once in the entire existence of the activity should be written. For example, you need to declare some Class-Scope variables, assign data to the list views, or link the XML elements with variables in the JAVA file, all this can be and should be done here. This method receives the parameter savedInstanceState, which is a Bundle object containing the activity’s previously saved state. If the activity has never existed before, the value of the Bundle object is null.
Below, is an example of the onCreate( ) method. It will give you an idea of how to declare and initialize variables and XML elements. Also, you will get an idea about how the onCreate( ) method works. Feel free to copy and use this code for practice purposes.
public class MainActivity extends AppCompatActivity {

    TextView textView;

    // some transient state for the activity instance
    String gameState;

    @Override
    public void onCreate(Bundle savedInstanceState) {
        // call the super class onCreate to complete the creation of activity like
        // the view hierarchy
        super.onCreate(savedInstanceState);

        // set the user interface layout for this activity
        // the layout file is defined in the project res/layout/main_activity.xml file
        setContentView(R.layout.activity_main);


        // initialize member TextView so we can manipulate it later
        textView = (TextView) findViewById(R.id.text_view);
    }

}
onStart( )
The system invokes this callback when the activity enters the Started state. This method is called once the onCreate( ) callback has finished. The onStart( ) call’s work is to makes the activity visible to the user as the app prepares for the activity to come in the foreground and start interacting with the user. This method is where the app initializes the code that maintains the User Interface.
The completion of the onStart( ) method is very quick and, similar to the Created state, the activity does not stay resident in the Started state. Once this callback finishes, the system invokes the onResume( ) method and, the activity enters the Resumed state.
onResume( )
When the activity enters the Resumed state, the system calls the onResume( ) callback and the activity is now in the foreground. The Resumed state is where the activity can interact with the user. Any activity continues to stay in this state until focus is taken away from the app by some other actions performed. Such an instance might be when the user navigates to another activity or minimizes the app or when the user receives a phone call or turns off the screen.
However, when a user minimizes the app or receives a phone call, the activity enters the Paused state, and onPause( ) method is called. And when the user comes back to the app, i.e when the activity again comes back to the foreground, its state changes from the paused state to resumed state again. At such times, the onResume( ) method is once again called and executed. So, it is wise to not initialize any components in the onResume( ) method that you will be releasing in the onPause( ) method. Only perform initializations that are supposed to happen again and again when the activity enters Resumed state. Below, is a simple example of the onResume( ) method.
public class MainActivity extends AppCompatActivity {

    ...

    @Override
    protected void onResume() {
        super.onResume();

        if(ConnectionDetector.isConnected()){
            //This is to check if the app is online.
            //Perform actions here
        }else{
            //Show message that the app is offline
        }

    }

    ...

}
The code above is to check whether the user is connected to the internet or not. Here, we wish to check whether the app is online or nor every time the app starts. So that even if the user minimizes the app and turns the mobile data off, our app knows about it and takes actions accordingly. Here “ConnnectionDetector” is another class that helps to check the network availability and “isConnected( )” is a method from this class. Please note that this class is not an inbuilt method in Android itself.
onPause( )
The onPause( ) method is called when the user is leaving the activity. It is the first indication of the user leaving the activity It does not always indicate that the activity is being destroyed, but it tells that the activity is now no longer in the foreground. Whenever a user leaves any activity it first enters into the Paused state and the onPause( ) method is called, then it enters the Stopped state and the onStop( ) method is called.
Use the onPause( ) method to temporarily pause the operations that need not be running while the app is in the background. The app will gain focus shorty and these paused operations can again be started in the onResume( ) method. There are several reasons because of which an activity may enter the Paused state, for example:
- Some event interrupts app execution.
- In Android 7.0 (API level 24) or higher, multiple apps run in multi-window mode. Because only one of the apps (windows) has focus at any time, the system pauses all of the other apps.
- A new, semi-transparent activity (such as a dialog) opens. As long as the activity is still partially visible but not in focus, it remains paused.
You can use the onPause( ) method to release the system resources if any in use by your application, such as GPS or Camera as the activity is in the background and the user no longer needs them. This will reduce the use of battery and system resources. But keep in mind that while in multi-window mode, the activity might not be in focus but is still visible to the user. In such a condition, the app will still enter the Paused state. So, avoid making any UI-changes or adjustments and completely freeing resources in the onPause( ) method. Rather, use the onStop( ) method for doing so.
Below is an example of onPause( ) method. In this example, we are checking if the app is using the camera. If yes then we free the resource and set the camera variable to null. Then the activity is ready to enter the Stopped state and hence calls the onStop( ) method.
public class MainActivity extends AppCompatActivity {

    ...


    @Override
    protected void onPause() {
        super.onPause();
        //When activity enters Paused state the onPause() method is called.
        //Checking is the app is using camera.
        if (camera != null) {
            //If camera is in use, release the camera resource.
            camera.release();
            //Setting the camera variable to null.
            camera = null;
        }

    }

    ...

}
onStop( )
The activity is in Stopped state when it is no longer visible to the user and the system invokes the onStop( ) callback. The activity can go Stopped for various reasons, for example:
- If the user navigates to a new activity and that new activity completely covers the screen.
- If the user minimizes the application and it is now in the background.
- When the activity is about to terminate, the system enters Stopped state, invokes onStop( ) callback once the onPause( ) callback is finished.
The onStop( ) method must be used to release any resources used by the application, as it is no longer visible to the user. Note that releasing resources must be done in the onStop( ) method and not in the onPause( ) method to make sure that the UI-related work and other functioning of the application continue even in the multi-window mode.
public class MainActivity extends AppCompatActivity {

    ...


    @Override
    protected void onStop() {
        super.onStop();
        //We are releasing resources as the activity
        //is no longer visible to the user.

        ServerConncetion.disconect();
        //Breaking the connection between the server and the app
        //as it is no longer required.

    }

    ...

}
In the above example, we can see that in the onStop( ) method we are disconnecting the application from the server. Here, “ServerConncerion” is an object of “server connection” class, and “disconnect( )” is a method from this class that helps in breaking the connection between the application and the server.
From the Stopped state, the activity is either resumed, in that case, it goes to the Restart state and restart( ) method is called ad the onResume( ) callback is made. Or it is terminated and never returns to the foreground, in that case, the system invokes onDestroy( ) callback and the activity is finished.
onDestroy( )
The system invokes the onDestroy( ) callback before the activity is about to be destroyed. Following are the reasons for onDestroy to be called:
- The activity is finished due to the user completely closing the activity or due to the finish( ) method being called inside the activity.
- the system is temporarily destroying the activity due to a configuration change such as device rotation or multi-window mode.
The onDestroy( ) callback should release all resources that have not yet been released by earlier callbacks such as onStop( ).
That’s pretty much it! You have got all you should know about Activities and Activity Lifecycle.
Now the next step is to create a new android project and start building your app. Use all that you have learned from here to make your app better and improve the user experience. Also, don’t forget to check out the rest of our content, we have complete guides on how to develop an app from scratch till deployment. Do comment and tell us about your doubts and queries, if any, we would love to help.
Related Posts


Leave a Reply Cancel reply
Search
RecentPosts
Recent Comments
Categories
- Android (8)
- Apps from Scratch (4)
- Contact Book App (3)
- Sher-o-shayari App (1)