Button in Android – How to add a button in android and perform actions on button-click
A button in any application is the simplest way to start any action or function when tapped on. In android, there are different types of buttons such as a simple Button, Image Button, Radio Button, Toggle Button. One can use any of these as per the requirement of the application. These buttons can have some text or an image on them. These texts and images can be set to the button using various attributes. A few of the important attributes of a button in android are mentioned below in the article. First, let’s take a look at how to add a button in android.
Adding a simple button in android:
Once you create a new project or open up your existing project, you can find an XML file by the name “activity_main.xml” and a JAVA file by the name “MainActivity.java“. As you know, we will be implementing the design of the button in the XML file and then set On Click Listeners to the button in the respective JAVA file. To do so, open the “activity_main.xml” file and follow the simple 5 steps given below to add a new button in android.
Step 1:
Make sure you remove all the views from within the layout that comes along when you create a project or new activity. If you already have implemented any views then let them be. The XML file will look something like below.
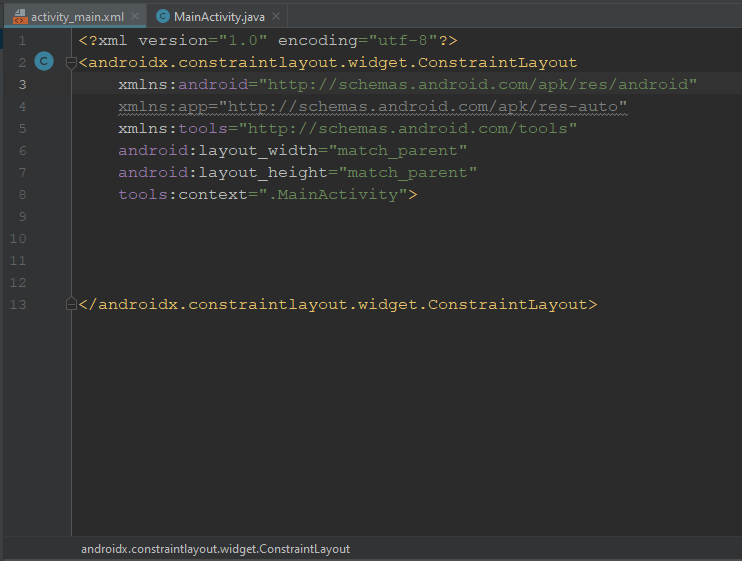
For this example, we are going to use the Constraint Layout, in which we have to set constraints to any two sides of a view to making sure it does not jump back to ( 0, 0 ) position.
Step 2:
Now, it’s time to actually write the code for the button. Have a look at the code below, that’s how a button is implemented in XML.
<Button
    android:layout_width="180dp"
    android:layout_height="60dp" />
This is the necessary code for implementing a button. You will be able to see the button in the preview besides. In the next step, we will add text and color to the button.
Make sure to write this code between:
<androidx.constraintlayout.widget.ConstraintLa yout>
and
</androidx.constraintlayout.widget.ConstraintLayout>
Step 3:
Now let’s add the code for adding text, increasing the text size and giving color to the button.
We need the attributes “android:test” for adding text to the button, “android:testSize” for changing text size and “android:background” for changing the background of the button. Note that we can set a color or an image as the background for an image. In this example, we have set a color as the background. To set an image as background just use this line of code:
android:background=”@drawable/NAME_OF_IMG”
Make sure you add an image in the “drawable” folder first.
<Button
    android:layout_width="180dp"
    android:layout_height="60dp"
    android:text="Click Me!"
    android:textSize="18sp"
    android:background="@color/colorPrimary" />
Step 4:
In order to perform a function on a button, we need to assign it an ID by which the JAVA file can identify the button and then set functions to it.
“android:id” attribute is used to set id to a button. In this example we have setting the id of the button as “button1”.
<Button
    android:id="@+id/button1"
    android:layout_width="180dp"
    android:layout_height="60dp"
    android:text="Click Me!"
    android:textSize="18sp"
    android:background="@color/colorPrimary" />
Step 5:
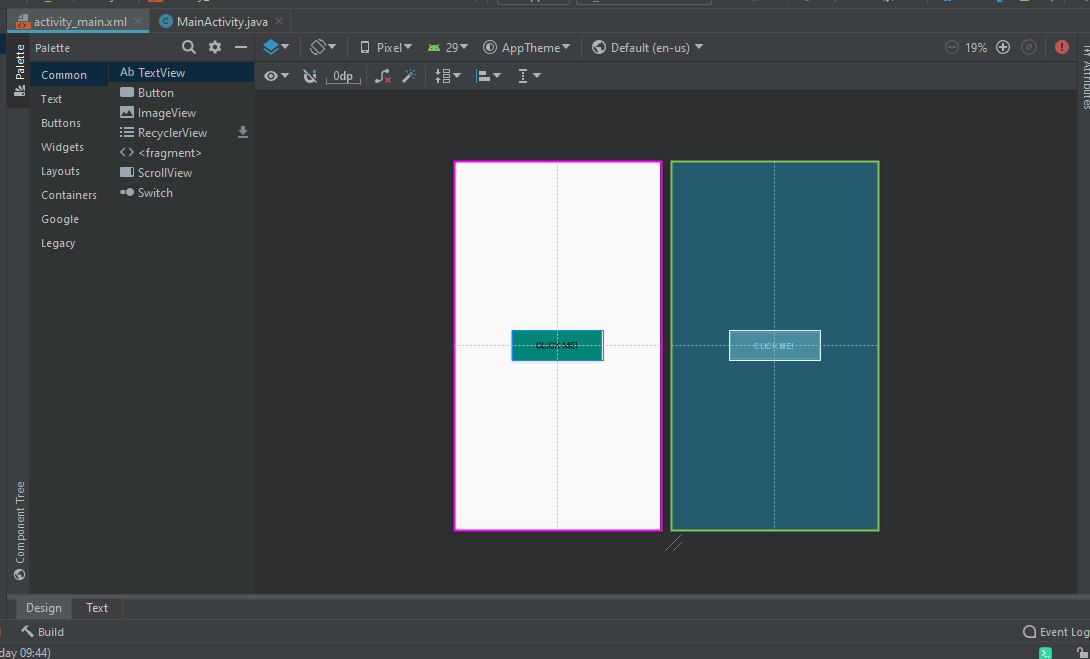
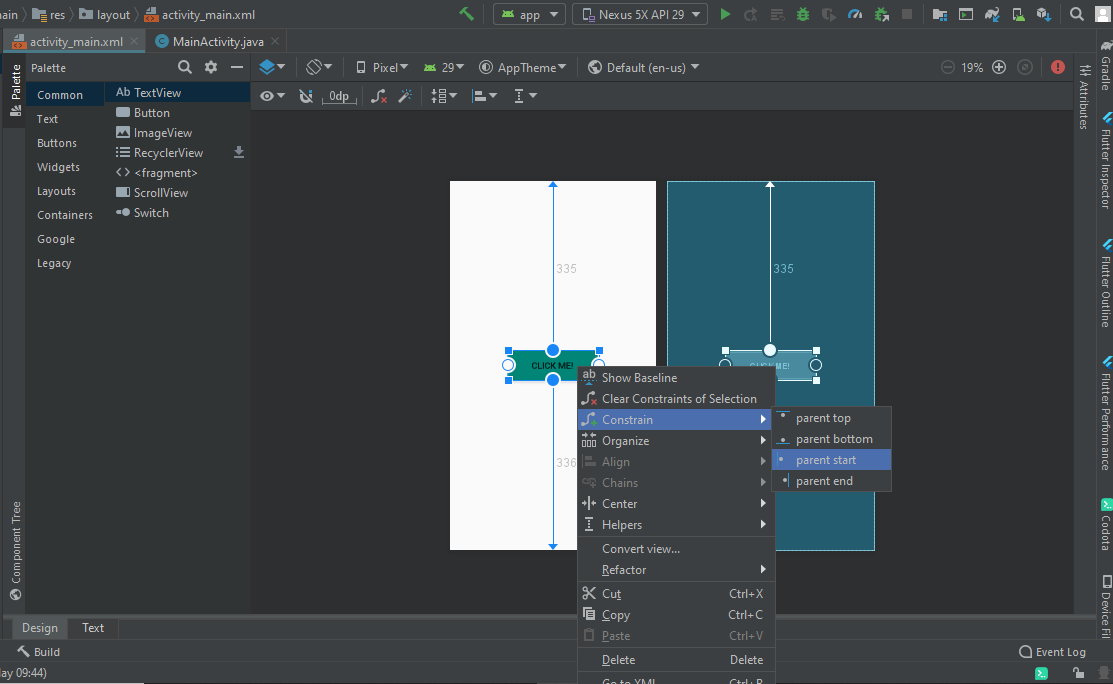
At the end, as we are using constraint layout, we need to ad constraints to our button. If we don’t do that the button will jump back to ( 0, 0 ) position when we run the application. To do that, click on the “Design” tab in the left-bottom corner of your editor besides the “Text” tab. Now you will be able to drag the button anywhere. Drag it right in center of the layout just as shown below.
Now, select the button, and right-click on it. A dialog will appear, select:
Constrain >> parent Top
Do it again and this time select:
Constrain >> parent Start
The constrains will appear
Complete code for implementing a button in android with constrains.
<Button
    android:id="@+id/button1"
    android:layout_width="180dp"
    android:layout_height="60dp"
    android:layout_marginStart="115dp"
    android:layout_marginTop="335dp"
    android:layout_marginBottom="336dp"
    android:background="@color/colorPrimary"
    android:text="Click Me!"
    android:textSize="18sp"
    app:layout_constraintBottom_toBottomOf="parent"
    app:layout_constraintStart_toStartOf="parent"
    app:layout_constraintTop_toTopOf="parent" />
Attributes for Button:
| Attribute | Description |
|---|---|
|
android:id |
used to assign a unique identity to a view.
|
|
android:layout_width |
used to define the width of the view. |
|
android:layout_height |
used to define the height of the view. |
|
android:text |
used to set the display text inside a button. |
|
android:textSize |
used to define the size of the text inside a button.
(Note: text size is always given in “sp”) |
|
android:textStyle |
used to set style (bold/italic/etc.) to the text |
|
android:layout_margin |
Used to set a margin from all sides of the view. |
|
android:layout_marginTop |
used to set top margin of the view. |
|
android:layout_marginBottom |
used to set bottom margin of the view. |
|
android:layout_marginStart |
used to set a margin from the left side of the view. |
|
android:layout_marginEnd |
used to set a margin from the right side of the view. |
|
android:background |
used to change the background of the view. |
|
android:padding
|
used to set a padding for the view. |
|
android:drawableLeft
|
used to set drawable (icon) to the felt of the view. |
|
android:drawableRight
|
used to set drawable (icon) to the right of the view. |
There are many more such attributes that can be used to design a button. Press Cltr+Space when writing these attributes to get suggestions of the various attributes you can use.
Performing Action on Button Click:
To perform an action when a button is clicked we make the use of a method- View.setOnClickListener. Well, this method is used for performing actions whenever any view is clicked and a button being a view in android it also uses the same method. Whatever our view is may it be a button or an imageView or anything else, just replace the “View” with variables name and you are all set to go.
Now, let’s take a look at how are we supposed to implement onCliclListener for the button we previously implemented. Fro this example we are going to display a simple Toast message when the user clicks the button. Remember that, our button has an id- “button1“. Follow the following steps to implement onClickListener on a button.
Step 1:
Open the “MainActivity.java” file or any of your respective java files.
First, we have to declare a Button variable to access the button we implemented. It is suggested to do it just above the onCreate( ) method. This will enable you to access the button form anywhere in the class.
Declare a Button variable named “Button1” as shown below.
...

public class MainActivity extends AppCompatActivity {

    //Declaring button variable
    Button Button1;


    @Override
    public void onCreate(Bundle savedInstanceState) {

...
Step 2:
Now, we have to initialize the “Button1” variable. The ID that we gave to our button earlier will now come in use. This ID is used by our variable to find the button view we intend to use. The method used to link the XML views with JAVA variables is- findViewById(R.id.Id_Of_The_View). This method takes a Resource Id as a parameter.
...

public class MainActivity extends AppCompatActivity {

    //Declaring button variable
    Button Button1;

    @Override
    public void onCreate(Bundle savedInstanceState) {
        super.onCreate(savedInstanceState);
        setContentView(R.layout.activity_main);

        //Linking XML Button view with JAVA variable
        Button1 = findViewById(R.id.button1);
...

    }
}
As you can see, the parameter needs to be given in a certain way, i.e. “R.id.Id_Name”. Here, the R is for the class android.R, which in turn belongs to the java.lang.Object class. For better understanding, the syntax for passing the parameter is- Resource(R)+type(id/layout/drawable)+id_name.
Step 3:
Now that we have linked our XML button view to out JAVA variable, it’s time to set OnClickListener to our button.
...

@Override
public void onCreate(Bundle savedInstanceState) {
    super.onCreate(savedInstanceState);
    setContentView(R.layout.activity_main);

    //Linking XML Button view with JAVA variable
    Button1 = findViewById(R.id.button1);

    //Setting onClickListener to perform action on button click
    Button1.setOnClickListener(new View.OnClickListener() {
        @Override
        public void onClick(View v) {

            //Displaying a simple toast message.
            Toast.makeText(getApplicationContext(),
                    "Button is clicked!",
                    Toast.LENGTH_SHORT)
                    .show();

        }
    });

    ...
The setOnClickListener( ) takes a paramenter
View.onClickListener( ) inside which an onClick( ) method is present. This onClick( ) method in turns takes a View as parameter . What ever you code inside this onClick( ) method is executed when you click the button.
Using this setOnclickListener( ) method, any view can be made clickable and actions can be performed when the click event occurs.
As you can see, inside the onClick( ), is the code for displaying a simple Toast. The syntax for Toast is: Toast.makeText(Context, CharSequence text, Int duration).
Here, context refers to which activity wants do display the Toast, a message string needs to be passed after that and we have to specify for how long do we want to display the Toast message. “Toast.LENGTH_SHORT” & “Toast.LENGHT_LONG”, are used to define the duration of Toast. In the end, the .show( ) method is used to display the Toast message. Without it, the Toast will not be displayed.
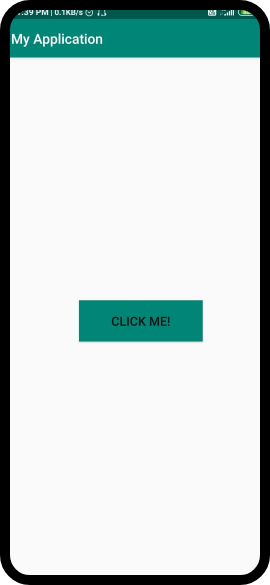
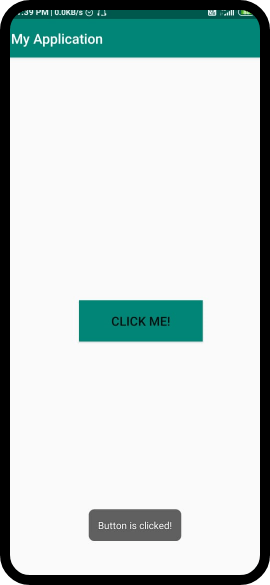
And that’s all, our button is now clickable. This is how the output will look like.
And that’s pretty much it. Below is the entire code for this example. If there occur any issues while implementing this example, refer to the code below. If your issues still don’t resolve, feel free to write a comment, we would love to help.
activity_main.xml
<?xml version="1.0" encoding="utf-8"?>
<androidx.constraintlayout.widget.ConstraintLayout
    xmlns:android="http://schemas.android.com/apk/res/android"
    xmlns:app="http://schemas.android.com/apk/res-auto"
    xmlns:tools="http://schemas.android.com/tools"
    android:layout_width="match_parent"
    android:layout_height="match_parent"
    tools:context=".MainActivity">

    <Button
        android:id="@+id/button1"
        android:layout_width="180dp"
        android:layout_height="60dp"
        android:layout_marginLeft="115dp"
        android:layout_marginTop="335dp"
        android:layout_marginBottom="336dp"
        android:background="@color/colorPrimary"
        android:text="Click Me!"
        android:textSize="18sp"
        app:layout_constraintBottom_toBottomOf="parent"
        app:layout_constraintStart_toStartOf="parent"
        app:layout_constraintTop_toTopOf="parent" />


</androidx.constraintlayout.widget.ConstraintLayout>
MianActivity.java
package comcodensi.app1;

import androidx.appcompat.app.AppCompatActivity;

import android.os.Bundle;
import android.view.View;
import android.widget.Button;
import android.widget.Toast;

public class MainActivity extends AppCompatActivity {

    //Declaring button variable
    Button Button1;

    @Override
    public void onCreate(Bundle savedInstanceState) {
        super.onCreate(savedInstanceState);
        setContentView(R.layout.activity_main);

        //Linking XML Button view with JAVA variable
        Button1 = findViewById(R.id.button1);

        //Setting onClickListener to perform action on button click
        Button1.setOnClickListener(new View.OnClickListener() {
            @Override
            public void onClick(View v) {

                //Displaying a simple toast message.
                Toast.makeText(getApplicationContext(),
                        "Button is clicked!",
                        Toast.LENGTH_SHORT)
                        .show();

            }
        });

    }

}
Related Posts

Leave a Reply Cancel reply
Search
RecentPosts
Recent Comments
Categories
- Android (8)
- Apps from Scratch (4)
- Contact Book App (3)
- Sher-o-shayari App (1)